
Helpful Things You Should Know
A list of Q&A’s From Our Customers
Several of our customers who own tool sharpening businesses have asked us to create an article base of helpful things to know with common tool sharpening procedures. To show our commitment to our clients the following articles describe step by step each process for several different tool sharpening methods.
Click to view the answers to the questions below.
QUESTION 1: How do you properly sharpen a dado set that has chippers? – Kevin
QUESTION 2: I have been in business for a few years and I am starting to get into a lot of retipping work. Every now and then I completely retip a blade. I am curious as to why you recommend using a 4″ wheel for side grinding instead of the 6″. I am using the AV-40 carbide grinder and I have no problem with the 6″, but I noticed in your operating instructions that you mention to use a 4″ diameter. Now that I am starting to do a lot of retipping; would I gain anything in using the 4″? Also, thanks for the recommendation on the silver solder; it really works good for pretinning tips. – Orville.
QUESTION 3: I have a retipping fixture and it has a large copper stop finger. I am having trouble with the finger sticking to the tooth when I braze the tooth in. I have cleaned it real good and it still sticks. Is there anything I can do with this one, or must I get a new one? Do you make them? – Dan
QUESTION 4: I am just getting started in the sharpening of router bits and am wondering if I ever have to sharpen the rounded part of the carbide on the router bit? – Glen
QUESTION 5: What are all the supplies needed for replacing broken teeth in saw blades, and what is the proper way to put teeth in? – David
QUESTION 6: What is the difference between hollow grinding and flat grinding carbide saw teeth? It seems like the tooth is stronger if you flat grind, or am I wrong about this? What is the reason for grinding two different ways? I would appreciate your opinion on this as you have given me some very helpful information in the past, and I respect your views. – John
QUESTION 7: What is the proper procedure for grinding saw teeth? Do you face first or top grind? When you replace a tooth, do you side grind it last or first? When you clean the saw blade around the teeth, is it ok to use a wire brush to remove the pitch buildup, and will this hurt the carbide? – James
QUESTION 8: Is it ok to hollow grind Jointer and Planer Knives, or should they be flat ground? – Glenn
QUESTION 9: I have a potential customer who is getting chipping on the bottom of the board when cutting. He is using a 10″ diameter, 50 tooth, 4 tooth and raker planer style blade, and also has tried a 60 tooth alternate top bevel blade. The 60 tooth has a 5 degree alternate top bevel. These blades were recommended to him by a saw blade salesman. He said the planer style blade does not chip as bad but he needs to eliminate the chipping altogether. He is cutting Oak for cabinets. I have made sure that they are correctly sharpened, so that is not the problem. He said if I can solve this chipping problem for him, he will give me all his work. Your help will be appreciated. – Lowell
QUESTION 10: I have been in business for about 4 years, and there has been a few times that I ran across blades where the wheel is too wide and I could not get my wheel down in the gullet to face grind the carbide teeth. Due to the fact that I hardly see this blades, would it be ok just to top grind these blades? I can’t see buying a wheel that I would use very seldom. – James
QUESTION 11: I have a carbide tipped saw blade that the steel on the back of the tooth is the same height as the carbide. What is the best way to remove it? I had seen somewhere that you recommend using the belt sander. I tried my belt sander but I can not get in between the teeth correctly as it seems to want to hang up or a better description would be, it wants to push the belt into the steel on the blade. – Lloyd
QUESTION 12: The grinder that I am using I can actually stop the wheel while grinding. Is this one of the reasons I am experiencing shorter wheel life. – James
QUESTION 13: I was thinking of going into sharpening hand saws but find that it is very expensive to purchase this kind of equipment. What is your opinion on sharpening handsaws? How much can I charge to do them?
QUESTION 14: What do you think the pros and cons of 7 degree blades versus 10 degree pitch blades would be?
Question 1
QUESTION 1: How do you properly sharpen a dado set that has chippers? – Kevin
ANSWER: A dado set consists of two outside blades and five to six inside chippers. There will be rakers on the outside blades. I will explain how to properly sharpen a dado set of this type.
1. First of all, many of the manufacturers have a different tooth configuration on the two outside blades, but they are all sharpened in the same manner. You would first grind the face of the teeth on the two outside blades, and then face grind the chippers.
2. Next you would top grind the cut-off teeth (beveled teeth) on the two outside blades. Note: When top grinding these two blades, you want to make sure you use your roundness gauge to check that both blades are of the same diameter after you have top ground them. After you check one blade, leave your gauge set and then set the next blade on and make sure you get the same reading. If you find one blade that is a little higher than the other one, grind it down until you get the same indicator reading from both blades.
3. Now you will top grind the chippers and the rakers on the two outside blades. Top grinding the outside blades and rakers is very simple if you set up properly. First set up to top grind one of the rakers on the outside blades. Once you have that setting, then sharpen all the rakers on both blades. Do not change any setting and proceed to top grind the chippers. After all the chippers are topped, then take your indicator and check to make sure that the rakers on the outside blades are approximately .012 to .015 thousandths lower than the cut-off teeth (beveled teeth). If you find that they are not, go ahead and grind the rakers down again on both blades. Proceed at that same setting to grind the chippers again. You must always remove the same amount off the top of the chippers as you remove from the rakers on the outside blades. Note: By doing this at that same setting you are keeping all the rakers on the outside blades and chippers the same height.
Summary: First face both outside blades and chippers. Next set up and top grind the cut-off teeth or beveled teeth on the outside blades, then top grind the rakers and chippers. Remember that the rakers and chippers must be .012 to .015 thousandths lower than the cut-off teeth on the outside blades. Always remember, whatever you remove from the rakers on the outside blades, you also want to remove that same amount from the chippers. By doing this, it will cut a flat bottom. By leaving the teeth on the outside blades .012 to .015 higher than the rakers and chippers you will prevent the rakers and chippers from tearing the wood.
Question 2
QUESTION 2: I have been in business for a few years and I am starting to get into a lot of retipping work. Every now and then I completely retip a blade. I am curious as to why you recommend using a 4″ wheel for side grinding instead of the 6″. I am using the AV-40 carbide grinder and I have no problem with the 6″, but I noticed in your operating instructions that you mention to use a 4″ diameter. Now that I am starting to do a lot of retipping; would I gain anything in using the 4″? Also, thanks for the recommendation on the silver solder; it really works good for pretinning tips. – Orville.
ANSWER: Once you try a 4″ diamond wheel for side grinding you will never go back to a 6″ again. You will be surprised what a difference just 2″ can make. The 4″ wheel allows you to bring the tooth in closer to the motor shaft before the wheel starts to grind. This gives less flexibility, making side grinding easier with faster stock removal.
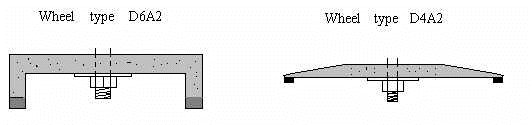
The reason you have not experienced any flexing or problems using the 6″ is because of the arbor we use on the AV-40 and also the saddle assembly which is very rigid with no play in it.
I will explain what happens when you have a grinder with play in the saddle assembly. As the tooth is passing under the wheel and starts to grind, the wheel actually pushes the tooth away from it or pushes the blade down. A 4″ wheel does help a lot if one has this problem but it does not completely eliminate it.
I recommend that you use a Type D6A2, 4″ diameter, 3/4″ thickness, depth of diamond section 1/16″, rim width 1/4″, E dimension (or back thickness) 1/4″ or 3/8″.
Another advantage with this style of wheel, which is clearly displayed in the diagram below, is that you can pass under the wheel without having to worry about the motor shaft hitting a tooth or the saw blade. The D4A2 which is a fairly standard wheel for face and top grinding in the industry, allows the motor arbor to extend below the grinding area, interfering in some cases with side grinding. Most interference occurs in blades with a high degree of positive hook angle. But the D6A2 allows the wheel diamond section to extend below the shaft, thus eliminating that problem.
Question 3
QUESTION 3: I have a retipping fixture and it has a large copper stop finger. I am having trouble with the finger sticking to the tooth when I braze the tooth in. I have cleaned it real good and it still sticks. Is there anything I can do with this one, or must I get a new one? Do you make them? – Dan
ANSWER: Dan, this is one of the problems that we cover in our two hour tool sharpening training video tape. We could make you one but we will save you some money by explaining what’s wrong and how to correct the problem.
The retipping fingers are made out of Tungsten Copper. After being used for a while, they lose their oxidation and no longer work for what they were intended for.
To correct this problem, remove the finger, clean it thoroughly in hot water, and then lightly touch all sides of it on a belt sander, just enough to remove any residue that may have adhered to it, that the hot water couldn’t remove.
Then with your torch set, heat the Tungsten Copper finger until it is cherry red. Then let it sit so it slowly cools off. It will turn dark purple. That means it has been re-oxidized. Now, when you use it, you will find that it will work as good as new.
Question 4
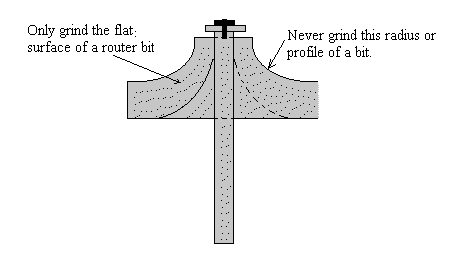
QUESTION 4: I am just getting started in the sharpening of router bits and am wondering if I ever have to sharpen the rounded part of the carbide on the router bit? – Glen
ANSWER: The rounded part on a router bit is the profile, or the actual part of the router bit that puts the design into the wood. Never grind the profile of a router bit. If you were to grind the profile, you would be completely changing the design that the router bit would cut. Only sharpen the flat part of the carbide on a bit. Below is a diagram of a corner-rounding bit, to better show what I am referring to.
Question 5
QUESTION 5: What are all the supplies needed for replacing broken teeth in saw blades, and what is the proper way to put teeth in? – David
ANSWER: We cover this in our 2 hour tool sharpening video tape, but I will list what supplies are needed, and give you some information on the supplies, and information on removing and replacing tips.. You need a retipping fixture, torch set, jar of flux, a flux brush, a wire brush, supply of carbide tips, and a saw set gauge which is also known as a side clearance gauge.
TORCH SET: I recommend that you use oxygen/acetylene. Any welding supply company can set you up with a complete oxygen/acetylene torch set. NOTE: Don’t try these small propane torch sets as they do not give enough heat for the silver soilder to flow. They will not work.
FLUX: A 1/2 LB jar of flux goes a long way as you must thin out the flux with water. I recommend that you take a jar that has a good cover, and put some of the flux in it. Then you add warm water and stir it until it turns to a paste, about the thickness of honey. Make sure you keep the jar covered tightly or it will dry out and harden.
FLUX BRUSH: Use this for applying the flux to the saw body or tooth area of the tooth you are to remove.
WIRE BRUSH: Use a good wire brush that has a handle on it for removing the old tooth from the seat of the saw blade.
CARBIDE SAW TIPS: There are a number of suppliers of carbide saw tips. You should get a list of the different sizes available and to start out with you should get an assortment of the most popular sizes. I also recommend when you first start out, that you purchase your carbide tips pre-tinned. The supplier of tips can help you with this.
SAW SET GAUGE: THORVIE can also supply you with a saw set gauge.
REMOVING AND PUTTING IN NEW CARBIDE TEETH
Whenever you remove a broken tooth from the saw plate, you must always flux around the tooth area of the tooth that you are going to remove. The flux actually helps prevent discoloration of the saw plate. You want to apply the heat directly onto the carbide tip. You must get the tooth hot enough or you will have trouble removing it. The minute the tooth is hot, strike it with the wire brush. There are times when you cannot prevent discoloring the saw plate somewhat, as some of the teeth can be difficult to remove.
Once the tooth is removed and you have selected the proper tooth to use, you want to make sure that the seat of the saw plate and the area around the seat has flux on it. Flux is what makes silver solder flow, permitting the silver solder to bond the tooth to the steel. You must apply the heat from your torch directly onto the carbide tip, and you must get the tip hot enough so the silver solder flows. Note: Heating a carbide tip until it is cherry red does not hurt it or do any damage. Once you have the tooth in, the next step is to clean the flux off of the tooth and the saw blade. The only way to properly do this is to use very hot water, as hot water dissolves the flux. If the steel on the saw plate is discolored around the tooth area, you would next take it to a bench grinder with a wire brush on it and you can wire brush the area that is discolored, on both sides of the blade. This will remove the discoloration. You are not hurting the tooth by wire brushing it because your next operation will be to grind it.
Question 6
QUESTION 6: What is the difference between hollow grinding and flat grinding carbide saw teeth? It seems like the tooth is stronger if you flat grind, or am I wrong about this? What is the reason for grinding two different ways? I would appreciate your opinion on this as you have given me some very helpful information in the past, and I respect your views. – John
ANSWER: First of all, I gave a few diagrams that are going to tell a lot about this subject, and hopefully will answer a lot of questions involving the hollow and flat grinding issue. I am showing the difference between flat and hollow side grinding, and top grinding. The diagrams clearly show that when you hollow grind the tooth, it takes away some of the support around the cutting edge of the tooth. The tooth will actually dull faster and the tooth will show more wear along the cutting edge sooner if you hollow grind. The cutting edge of the tooth dulls faster when hollow grinding. You can clearly see why that would happen when you look over the diagrams. Also when hollow grinding, more carbide will have to be removed when sharpening the tooth in order to bring back the cutting edge. Which in return shortens the life span of the saw blade.
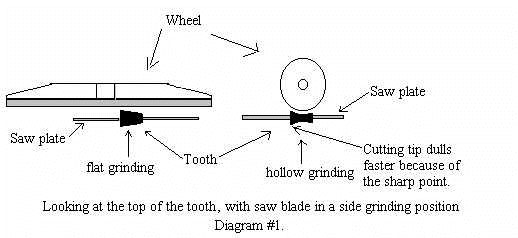
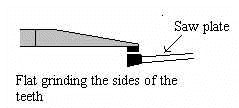
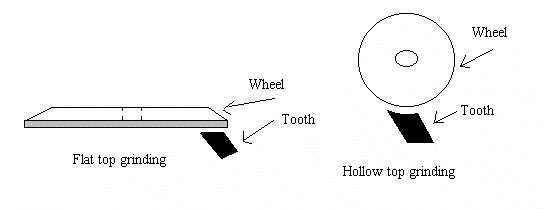
You asked what is the reason for the two different grinds. The only reason is because some machines are built to grind off the outer radius of the wheel, and some are built to grind off the flat part of the wheel “See below diagrams”.
I believe that the diagrams are self explanatory and should answer all questions related to the hollow and flat grinding issue. As the saying goes , a picture specks a thousand words.
Question 7
QUESTION 7: What is the proper procedure for grinding saw teeth? Do you face first or top grind? When you replace a tooth, do you side grind it last or first? When you clean the saw blade around the teeth, is it ok to use a wire brush to remove the pitch buildup, and will this hurt the carbide? James
ANSWER: You should always grind the teeth in the below following order. As far as the wire wheel, go right ahead and use it as it will not hurt a thing. After you clean the blade and the tooth area. You must then sharpen the teeth. I recommend that you use a medium grit wire wheel. You can use that wire wheel for cleaning all the tools before sharpening them. CAUTION: make sure when ever you use a wire wheel that you use eye protection that completely covers the eye area, as these small wires brake free, they can cause eye injury.
IF you are only sharpening, and did not replace any teeth, then you would sharpen the teeth in the following order.
Step 1. First face grind all the teeth.
Step 2. Top grind the teeth.
If you had replaced teeth in the saw blade, then you would sharpen the teeth in this following order.
Step 1. First face grind all the teeth.
Step 2. Side grind only the teeth you replaced.
Step 3. Top grind all the teeth.
Question 8
Hollow grinding Knives
QUESTION: Is it ok to hollow grind Jointer and Planer Knives, or should they be flat ground? Glenn
ANSWER: The below diagrams show the flat and hollow ground knives. On the hollow ground knife, you will notice the space between the honing stick and the knife. My personal experience over the years with Jointer and Planer knives is that, the customer wants his knives to be hollow ground for this reason. So he can take a honing stick and stroke it back and forth the length of the knife, to restore the cutting edge on a hollow ground knife. Hollow grinding the knife, allows the customer to sharpen the knife while it is still on the machine, and he does not have to change the knife as often. He gets a few free sharpening on his own. I have found customers who would not let you touch the knives, unless you hollow ground them.
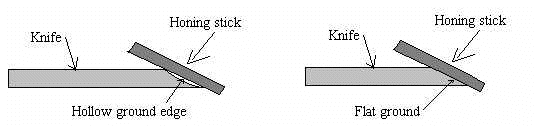
Just by viewing the diagrams you can clearly see why it is easy to bring back the cutting edge with a honing stick, on a hollow ground knife.
Question 9
QUESTION: I have a potential customer who is getting chipping on the bottom of the board when cutting. He is using a 10″ diameter, 50 tooth, 4 tooth and raker planer style blade, and also has tried a 60 tooth alternate top bevel blade. The 60 tooth has a 5 degree alternate top bevel. These blades were recommended to him by a saw blade salesman. He said the planer style blade does not chip as bad but he needs to eliminate the chipping altogether. He is cutting Oak for cabinets. I have made sure that they are correctly sharpened, so that is not the problem. He said if I can solve this chipping problem for him, he will give me all his work. Your help will be appreciated. Lowell
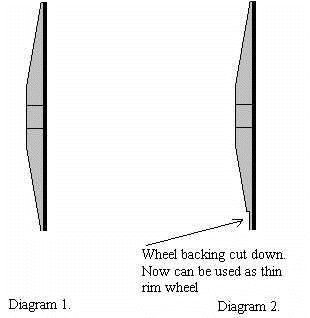
ANSWER: Oak is a hard wood and it has a lot of grain. The more grain in wood, the better the chance for tear out. Your customer needs a saw blade with a tooth style that will give a shearing action, eliminating the blunt force that is applied to wood when being cut by a saw blade of standard tooth design. Most other wood will not have a problem with tear out using the standard tooth. The 50 tooth, 4 tooth and raker style blade, also known as the planer style blade, is a very good all around cutting saw blade and delivers one of the finest cuts because of the raker style. But it is not for cutting Oak when you are looking to eliminate tear out. The 60 tooth blade you mentioned is just a plain standard cut off blade, and I can clearly see why he has a problem with using this blade. Tell the customer that you will, or he should get a 80 tooth, 10 to 15 degree positive hook angle, and 20 degree alternate top bevel blade. This saw blade has more cutting teeth than what he was using. It has more of a shear action cutting performance needed to solve the chipping problem because of the 20 degree top bevel, which will eliminate a lot of the blunt force applied to the bottom side of the wood, and will provide a much smoother cut, leaving your customer very happy.

Diagram 1 shows a 20 degree top bevel. Diagram 2 shows a 5 degree top bevel. The tooth in diagram 1 clearly shows that it would cut the wood more easily and deliver less of a blunt force to the wood than the tooth in diagram 2. therefore delivering a smoother cut.
Question 10
QUESTION: I have been in business for about 4 years, and there has been a few times that I ran across blades where the wheel is too wide and I could not get my wheel down in the gullet to face grind the carbide teeth. Due to the fact that I hardly see this blades, would it be ok just to top grind these blades? I can’t see buying a wheel that I would use very seldom. James
ANSWER: The problem you are referring to usually happens on a 10″ diameter blade with more than 72 teeth or a 12″ with 80 or more teeth on the saw blade. The carbide tip usually comes real close to the steel backing of the tooth in front of it, which interferes with getting the wheel to go deep enough into the gullet to face the tooth, because of the wheel thickness. I will explain how you can get around this without having to buy a special thin rim wheel, but first of all I want to point out a few things that we must think about when offering our service to others.
If you have a customer who is giving you his service work, it would be a very small investment to buy a thin rim wheel so you could give him the best quality sharpening job. If you would just top grind that saw blade, you would not be properly restoring the cutting edge. Yes, you could get by for a sharpening or two but it is not the way to service your customer’s tooling and expect to keep him coming to you, as he will start to notice the difference in the cutting performance of the blade. Always face and top grind the carbide teeth of a saw blade.
I will now explain how you can use one of your diamond wheels and shape it so you can use it as a thin rim. First select a wheel that you have already been using, that is almost worn out. Then, mount that wheel onto your carbide grinder. Use an old carbide tipped router bit that is straight flute (a router bit that is not going to be re-used again), and dress the aluminum on the back side of the diamond section of the wheel. Caution: Be careful so as not to remove too much of the aluminum backing to where you would be weakening the support of the diamond section. You’ll find a straight flute carbide router bit, when held with both hands, will shave that aluminum backing off very easily.
Below are two diagrams. Diagram number 1, shows a regular standard diamond wheel for sharpening saw blades. Diagram number 2, is showing the same wheel as in diagram 1, but only with the aluminum backing shaved down.
Question 11
QUESTION: I have a carbide tipped saw blade that the steel on the back of the tooth is the same height as the carbide. What is the best way to remove it? I had seen somewhere that you recommend using the belt sander. I tried my belt sander but I can not get in between the teeth correctly as it seems to want to hang up or a better description would be, it wants to push the belt into the steel on the blade. – Lloyd
ANSWER: Lloyd, this is a real good question, and thank you for bringing this up.
NOTE: The platen must be modified on the belt sander in order for it to work properly. We include full diagrams and show how to do this when a customer buys the Thorvie AV-40 package. We also help you take care of this problem when the fellows buy the belt sander from us.
Question 12
QUESTION: The grinder that I am using I can actually stop the wheel while grinding. Is this one of the reasons I am experiencing shorter wheel life. James
ANSWER: That is exactly what happens when you do not have a motor with enough Amp’s and it results in loss of motor RPM while grinding.
Thorvie International’s past experience in manufacturing carbide tipped saw blades and cutting tools and the servicing of cutting tools has also shown us that to get the best performance and life out of a diamond wheel and to get the best quality sharpening job, you must make sure you use a grinder that does not lose motor RPM when grinding. Not having consistent motor RPM is the main factor in wheels wearing out too soon. Many individuals either overlook this or don’t realize the importance of it. This is another area where Thorvie International helps you to avoid this problem. Our AV-40 grinder maintains 3450 wheel RPM at all times, no matter what thickness or width of carbide you are grinding. With the wheels we supply with our grinder, you get the maximum wheel life and the best quality sharpening job to satisfy and keep your customers. You must always remember that the wheel is what grinds the tool. The operator of the machine only feeds the tool into the wheel. So it is very easy to understand why maintaining motor RPM is important along with using good grinding wheels.
Coolant
Secondly stay away from mist or flood coolant as it is very messy and it is a health hazard because when using water when grinding carbide with a diamond wheel on machines such as those that you manually operate, you are constantly standing over them (some companies that sell machines with coolant systems fail to tell you this). Also, when using any type of coolant with grinding equipment, there is a tendency for the moisture to collect into the bearings on the motor and also the saddle assembly, resulting in bearing freeze up and corrosion. Thorvie International can tell you this for a fact because we sell our AV-40 Carbide Grinder saddle assembly for other manufacturers’ equipment, and we sell a lot of them, because of the coolant destroying the bearings. We have never had to replace a motor or bearings for one of our AV-40 Carbide grinders.
Question 13
QUESTION: I was thinking of going into sharpening hand saws but find that it is very expensive to purchase this kind of equipment. What is your opinion on sharpening handsaws? How much can I charge to do them?
ANSWER: The use of handsaws has been diminishing fast over the years. If you go to a job site you will now find that the carpenters have battery operated skill saws using carbide tipped blades. They take their portable table saws right out to the job site. Now days you give a young carpenter a hand saw and he may look at you and say (what is this for)? We are now living in times where speed is all that counts. So with the use of the power tools they can get a better cut and do the cutting in a fraction of the time that it used to take with a handsaw. You are right, as the cost of this equipment for doing handsaws can be over $5,000.00. You would never get your money back on that type of investment.
Now I will point out some of the disadvantages of sharpening handsaws verses the sharpening of other types of wood cutting tools. To sharpen a handsaw, you had to use what was called an automatic handsaw filer. These machines had a tendency of the feed pawl having a tendency of skipping teeth. The only way you could correct that would be to re-tooth a handsaw. Then you would have to re-set the saw with an automatic setter and then go back and re-file it. If you were able to file the handsaw without having any problem; to set the machine up and complete the sharpening, it would take approximately 20 minutes per hand saw. That’s if you were very lucky. You could only charge between $4.50 and $6.50 per handsaw. You must keep in mind that there is the rip, crosscut, and also the miter box saws. The finer the teeth, the more problems you would run into. While you were filing that handsaw, if the filer skipped a tooth where you had to re-tooth it, you would end up spending 45 minutes to sharpen that one handsaw. Considering the cost of the files being three to four dollars each, and with the files not lasting long, there is no money in sharpening handsaws. Even worse is that if you had to re-tooth the hand saw because the filer skipped, you could not charge your customer for re-toothing as it was not his fault that the machine skipped and wiped out teeth. It’s more of a headache than it’s worth. Anybody who has done it in the past will tell you this. The money is made in the sharpening of all other woodworking tools.
You consider the AV-40 Carbide grinder package selling for $6,995.00 (and look at all the different tools that can be sharpened with the AV-40) versus the price that we mentioned above for handsaw sharpening equipment and you can clearly see that sharpening handsaws is a money losing proposition. You can sharpen three carbide tipped saw blades in the same amount of time that you can sharpen one handsaw. Also, depending on the type of carbide blade, you could have made $45.00 in that same amount of time versus the $6.50 maximum for a handsaw. It was easy to use up one complete file on a handsaw. Years ago, some of the handsaws were made of Swedish steel which became very brittle when it got older. Sometimes you would have to re-tooth the handsaw several times before you were able to remove the brittle steel.
Question 14
QUESTION: What do you think the pros and cons of 7 degree blades versus 10 degree pitch blades would be ?
ANSWER: Taken from “Sawmill & Woodlotagazone” by Gene Wengert the “WoodDoc”.
TOOTH ANGLE – There are three angles of a saw tooth; these three total 90 degrees. The first angle is the clearance angle, which is an angle required so that the back of the tooth (the metal immediately behind the tooth) does not rub on the wood as the blade advances into the cut. This clearance angle, if not present , would result in rubbing, heating and extreme difficulty in feeding the saw into the wood. This clearance angle is typically 10 to 12 degrees.
The next angle is the hook angle. The greater the hook angle, the more the saw is going to grab the wood and dive into the cut. [Have you ever tried to cut lumber with a radial arm saw and the saw actually wanted to come flying through the piece of wood so much that you had to hold the saw back? This is because there was too much hook in the blade. A radial arm saw blade usually has zero hook or even slightly negative; use the wrong saw and the radial arm saw will be difficult to control. On the other hand, if you used a zero or negative hook angle saw blade on a table saw, the end result would be that the wood piece being sawn would require a lot of force to feed into the saw and usually the piece will want to come flying back at the operator.]
The hook angle for bandsaws for sawmills typically is between 4 degrees to 13 degrees. With less hook than 4 degrees, the effort to feed the saw into the wood becomes greater; with more hook than 13 degrees, the saw can come off the wheels or can break.
A second effect is that with less hook, the horsepower required for the saw is reduced.
With more hook, especially for dense or frozen wood, the blade will have to be fed very slowly; if fed too fast, the blade will likely stall. With slow feed, we get fine sawdust and this leads to heating (see previous discussion), rapid dulling, poor performance, poor thickness uniformity for the lumber, etc. [I have heard from many mill operators about the limited amount of footage they saw until they have to change blades…my initial guess, assuming they did not have dirty logs, is that they have too much hook on the blades, so they fed slowly and got heating.]
Here are general recommendations:
4 degree hook Use for well frozen (under 20 F) wood and/or dense wood.
7 degree hook Use with higher horsepower mills for frozen and/or dense wood, including many dense tropical hardwoods; also use for larger diameter logs and medium or lower power on medium or low density wood.
9 degree hook Use with lower horse power mills cutting smaller logs; also with other powered mills cutting denser hardwoods.
10 degree hook Use for most hardwoods (except the densest like hickory) and most softwoods except for a lower powered mill; this is a general purpose, all around hook.
13 degree hook Use for most softwoods on most mills, although a smaller hook might work better for southern pine, as SYP is very dense.
IMPROVING TOOTH TIPS – The tip of the saw tooth can be just ordinary metal, identical to the metal of the saw body. Typically, such metal is fairly soft and will wea r quickly; as a result, the tooth will dull quickly.
One, somewhat inexpensive, alternative that makes the tooth harder is to heat the tooth and then quench it in a cold liquid; the resulting tooth is much more durable, but is slightly more brittle. Usually the hardening process uses induction heating, thereby heating only the tooth and making the tooth harder, but not affecting the properties of the body of the blade.
Another alternative is to put a more durable material on the tip of the tooth. Durable materials include
Carbide (a combination of tungsten, carbon and cobalt in various proportions to increase times between sharpening by ten, although the material is prone to chipping when it hits hard items like rocks, tools, etc.)
Stellite (R) (Stellite, invented in the early 1900s, is a proprietary carbide material with cobalt, chromium, and a variety of other elements such as tungsten, nickel, molybdenum and carbon. It is less brittle than carbide and lasts longer but does cost more.)
Chrome (chromium carbide, very durable and expensive)
There is no question that logs with dirt and other hard debris on the outside will quickly short useful tooth life, especially when using these special teeth that tend to be more brittle. To lengthen tooth life, several options are to clean logs with a power washer, remove bark (as the crevasses in bark often hold logs of grit), and store cleaned logs up off the ground.
SET OR SWAGE – Now that we have the tooth ready to go, we need to figure out a way to make the slot that the tooth cuts, the kerf, just a bit wider than the body of the blade. Without this extra space, the blade will rub, heat, etc. Actually, when we cut a slot in the wood, the wood cells will spring back slightly, closing the slot just a bit after the cells are cut, so the kerf must be just a bit wider than we might calculate initially.
Basically, there are two choices for cutting a a wide kerf: Make the tip of the tooth a bit wider, called swaging and done by hitting the tooth tip with a hammer and a special tool called a swage; or by bend the teeth, one to one side and the next one to the other side of the blade body, called setting the teeth. With small band saws, setting is the most common technique. Setting must be done carefully so that the protrusion in each side of the blade is identical. If uneven, then the blade will wander and can even take off cutting on its own, undesired path. Special, simple equipment can be purchased to set the teeth yourself. Setting is usually done after sharpening.
The required set is less for denser woods than for softer, less dense species.
In some cases, after two teeth are set, one to each side, the third tooth, called the raker tooth, is left straight. Then the fourth and fifth teeth are set and the sixth is left straight, and so on. This is called a triple chip blade and would be used for crosscutting, but is not widely used in most small band sawmills, but such blades are available.
TOOTH SPACING OR PITCH – The closer the teeth are spaced, the less power per tooth (but overall the power is the same if the feed rate is the same at any tooth spacing) and finer the sawdust. With wider spacing, however, the amount of sawdust that the gullet of each tooth increases. With large logs, the gullets may fill and then the excess sawdust will spill out and cause heating.
In my experience, 7/8″ is the most common spacing, but closer and further spacing is available. My favorite is 1-1/8″ especially for most softwoods and low density hardwoods. For well frozen logs, 3/4″ is probably more reasonable. In general, it is common to find that the spacing is too close for many mills. One of the best ways to judge the result of spacing and feed rate is to look at the sawdust; very fine sawdust is often an indicator of slow feed and close spacing. The larger spacing does require a wider blade, however, to handle the extra stress per tooth.